Integration documentation
Complete the basic connection flow, then choose the client, tool, or developer API that matches your use case.
Basic connection flow
These four preparation steps apply to every client guide. Complete them before configuring Codex, OpenClaw, Claude, Cursor, or another tool.
Base URL
https://api.onlyrouter.aiCreate an account
Create an OnlyRouter account with your email address and sign in to the console.
Add balance
Choose an amount and payment method. The balance syncs to the console after payment.
Create an API key
Generate a key on the API key management page. You can manage separate keys for each project or client.
Copy the configuration and start calling
Enter the API key and Base URL in your model tool, such as OpenClaw, Codex, an agent, or your own application.
Important
OnlyRouter Switch setup
OnlyRouter Switch is the official local configuration app. It writes your OnlyRouter API key into Codex or Claude Code, so you do not need to edit configuration files, environment variables, or provider fields manually.
Install the official configuration app
The download page shows packages for your operating system. Install the app, then follow these steps.
Download and install OnlyRouter Switch
Open the software download page, choose the Windows or macOS package, and install it. Open OnlyRouter Switch and grant the local configuration permissions requested by your system.
Configure an API key in OnlyRouter Switch
Create or copy a dedicated Codex / Claude Code token on the console API Keys page, then enter it in OnlyRouter Switch. Separate keys per client make limits, revocation, and usage review easier.
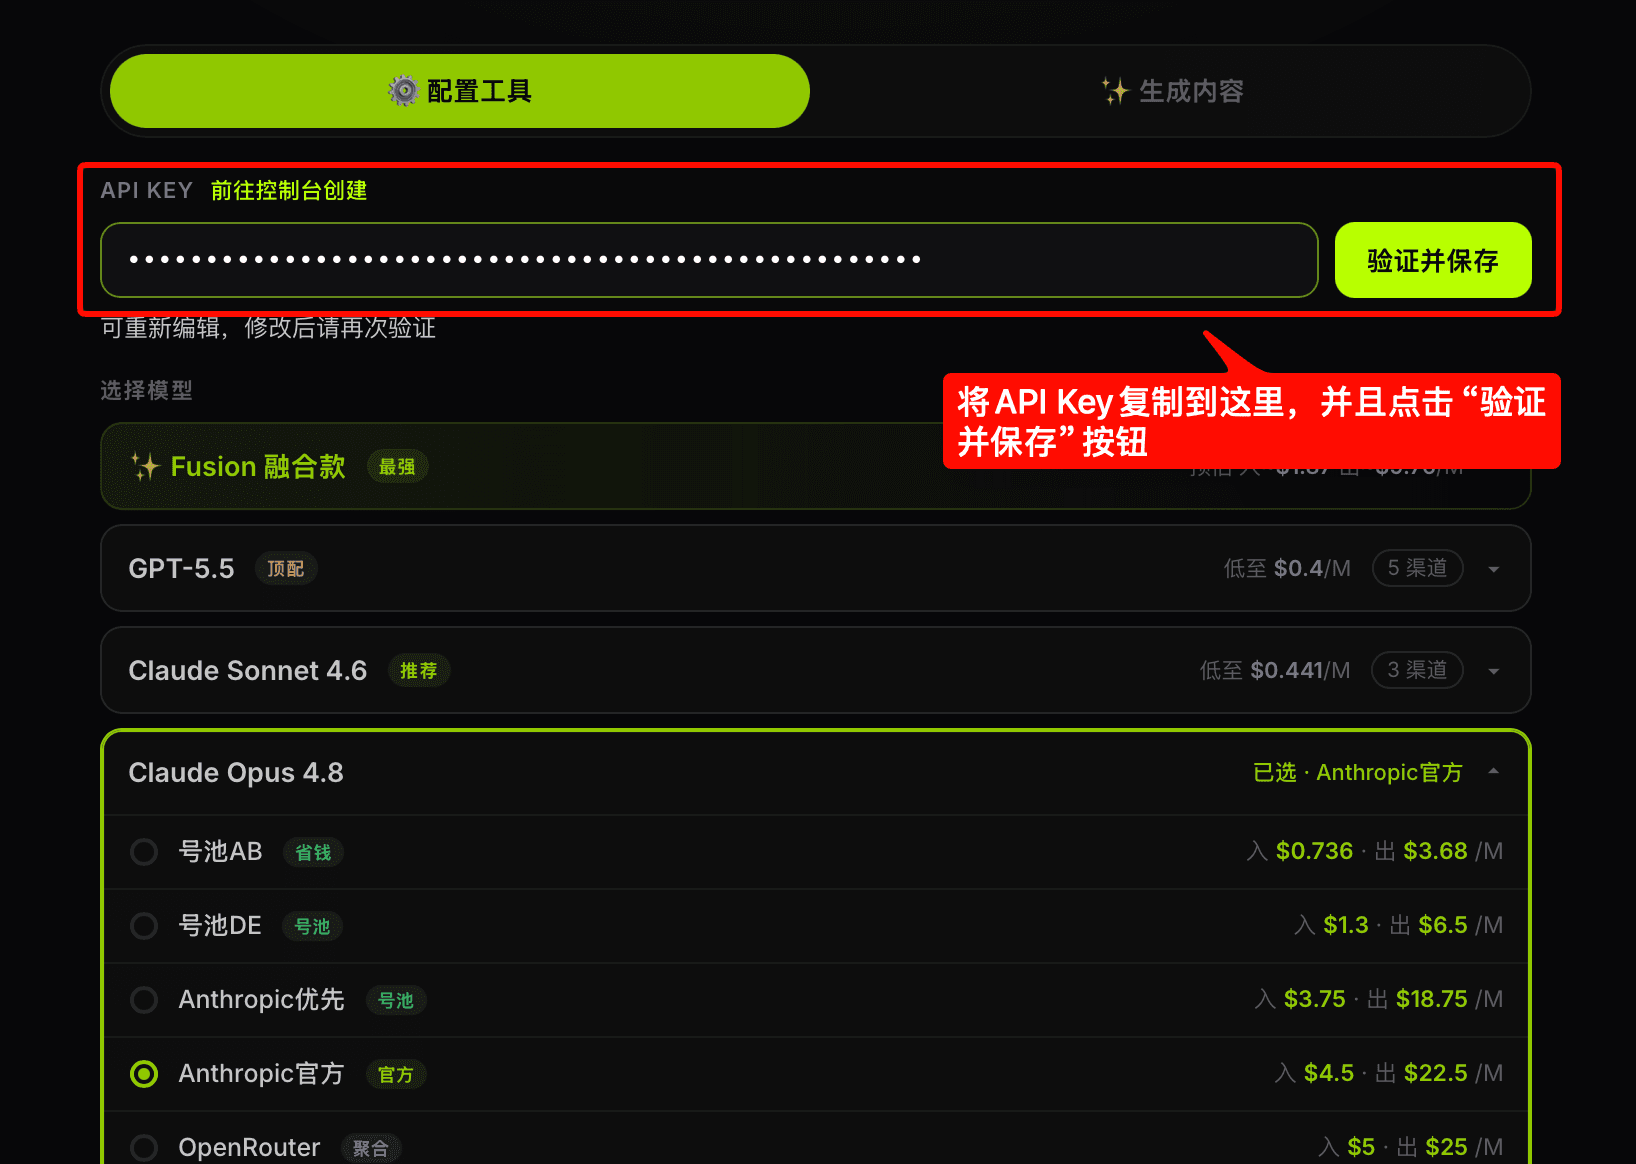
Configure with one click
Choose a model, then select the one-click Codex or Claude Code configuration action.
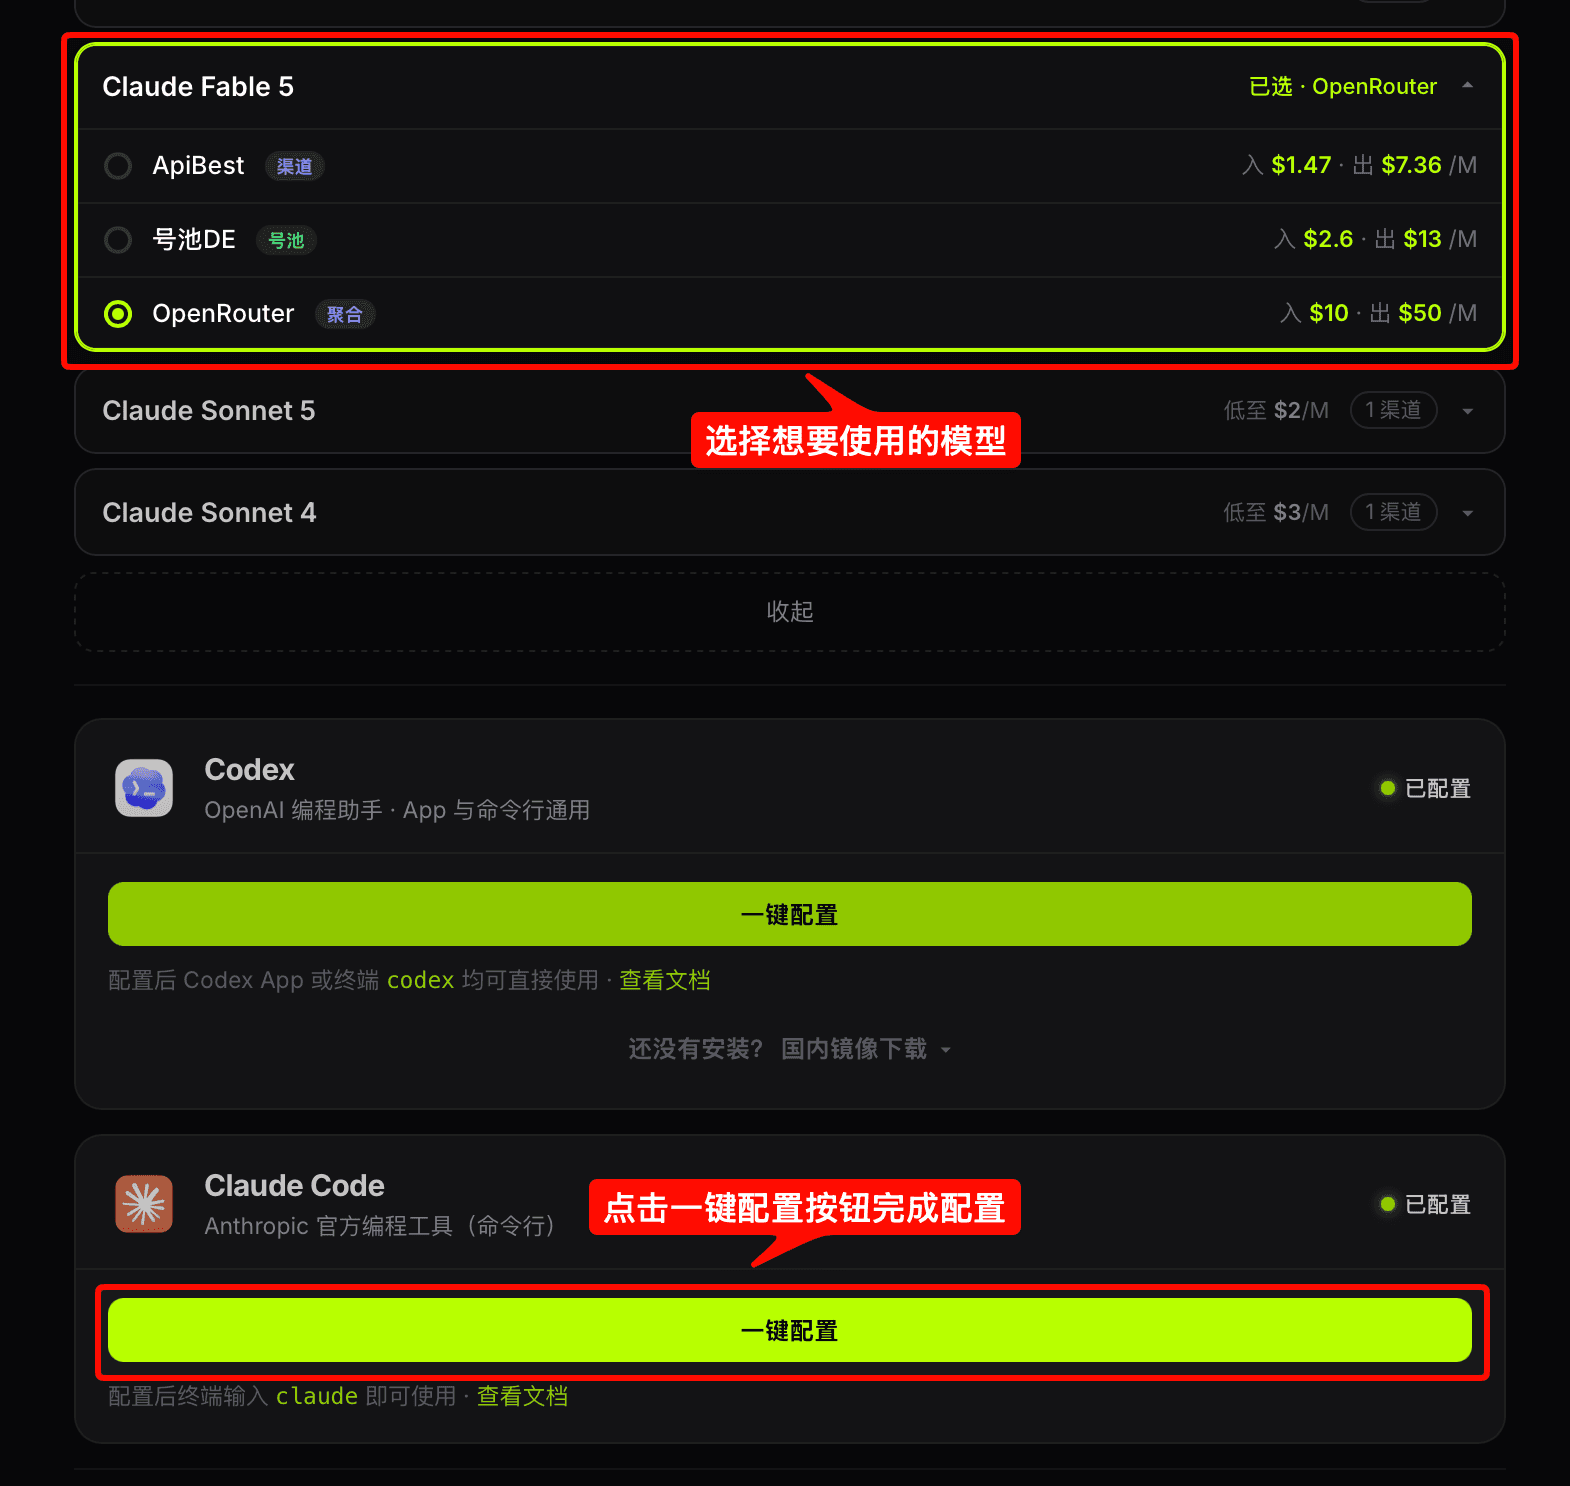
Restart the client and verify
For CLI tools, quit the current process, reopen the terminal, and start Codex or Claude Code again. For desktop clients, quit and reopen the app. Send a short request and confirm it in console usage records.
Client setup
Choose a client and follow its steps. Current guides cover Codex, OpenClaw, Claude Code, Claude Desktop, and other clients.
Codex client
Update ~/.codex/config.toml, restart Codex, and sign in with an API key.
Copy this config.toml
# Basic configurationmodel_provider = "custom"model = "gpt-5.5"model_reasoning_effort = "xhigh"disable_response_storage = truepersonality = "pragmatic"
# Custom provider configuration[model_providers.custom]name = "onlyrouter"base_url = "https://api.onlyrouter.ai/v1"wire_api = "responses"requires_openai_auth = trueOpen the Codex configuration
In Codex, go to Settings -> Configuration and open config.toml. CLI users can edit ~/.codex/config.toml directly.
Paste and save the configuration
Copy the config.toml content below and save the file.
Sign out and quit Codex completely
Sign out, then quit the application completely instead of only closing its window.
Sign in again with an API key
Restart Codex, choose API key sign-in, and enter your OnlyRouter API key.
Send a test message
After signing in, send a short prompt. A normal response confirms the configuration.
CC Switch setup
For existing CC Switch users. Prefer the console's Fill into CC Switch action, or maintain provider fields manually.
CC Switch configuration details
Install with Homebrew on macOS
brew tap farion1231/ccswitchbrew install --cask cc-switchFields for a manually added provider
Claude / Gemini endpoint: https://api.onlyrouter.aiCodex / OpenCode endpoint: https://api.onlyrouter.ai/v1API Key: <YOUR_ONLYROUTER_API_KEY>Homepage: https://onlyrouter.aiEnabled: trueDownload URL
https://github.com/farion1231/cc-switch/releases
Install or open CC Switch
Existing CC Switch users can skip installation. New users can download Windows, macOS, or Linux packages from Releases, or install with Homebrew on macOS. On first launch, open Settings -> General and enable the recommended startup, silent launch, Claude Code integration, skip-confirmation, and minimize-to-tray options.
Create a dedicated API key
Create a dedicated token on the API Keys page. Separate keys for Claude, Codex, OpenCode, and OpenClaw simplify limits, revocation, and log review.
Fill into CC Switch from the console
Click Fill into CC Switch in the API key list, then choose the application, provider name, and main model. The dialog supports Claude, Codex, OpenCode, and OpenClaw and no longer asks for Haiku, Sonnet, or Opus mappings.
Confirm deep-link import
Click Open CC Switch. The browser opens a ccswitch:// import link; confirm it to write the provider into CC Switch.
Or add the provider manually
If you maintain providers manually, use the fields above. Codex and OpenCode use the /v1 endpoint; Claude and Gemini use the site root. Enter a user token as the API key.
Enable and verify
Enable the provider from the CC Switch list or tray menu. Claude Code usually supports hot switching; restart Codex or Gemini CLI if the change is not applied immediately.
Important
Developer API
Call OnlyRouter directly from application code, SDKs, or automation through OpenAI-compatible, Anthropic-compatible, image, video, and audio APIs.
Request examples
Use this minimal request to verify the API key, Base URL, and model ID for an OpenAI-compatible endpoint.
OpenAI Request examples
curl https://api.onlyrouter.ai/v1/chat/completions \ -H "Authorization: Bearer sk-your-key-here" \ -H "Content-Type: application/json" \ -d '{"model":"gpt-5.5","messages":[{"role":"user","content":"Hello!"}]}'Tutorials
Complete, task-oriented guides that cover preparation, configuration, operation, and verification.
A complete walkthrough from preparing an OnlyRouter API key and configuring Codex to generating a poster prompt with an OnlyRouter model.
Open the Codex configuration
In Codex, go to Settings -> Configuration and open config.toml. CLI users can edit ~/.codex/config.toml directly.
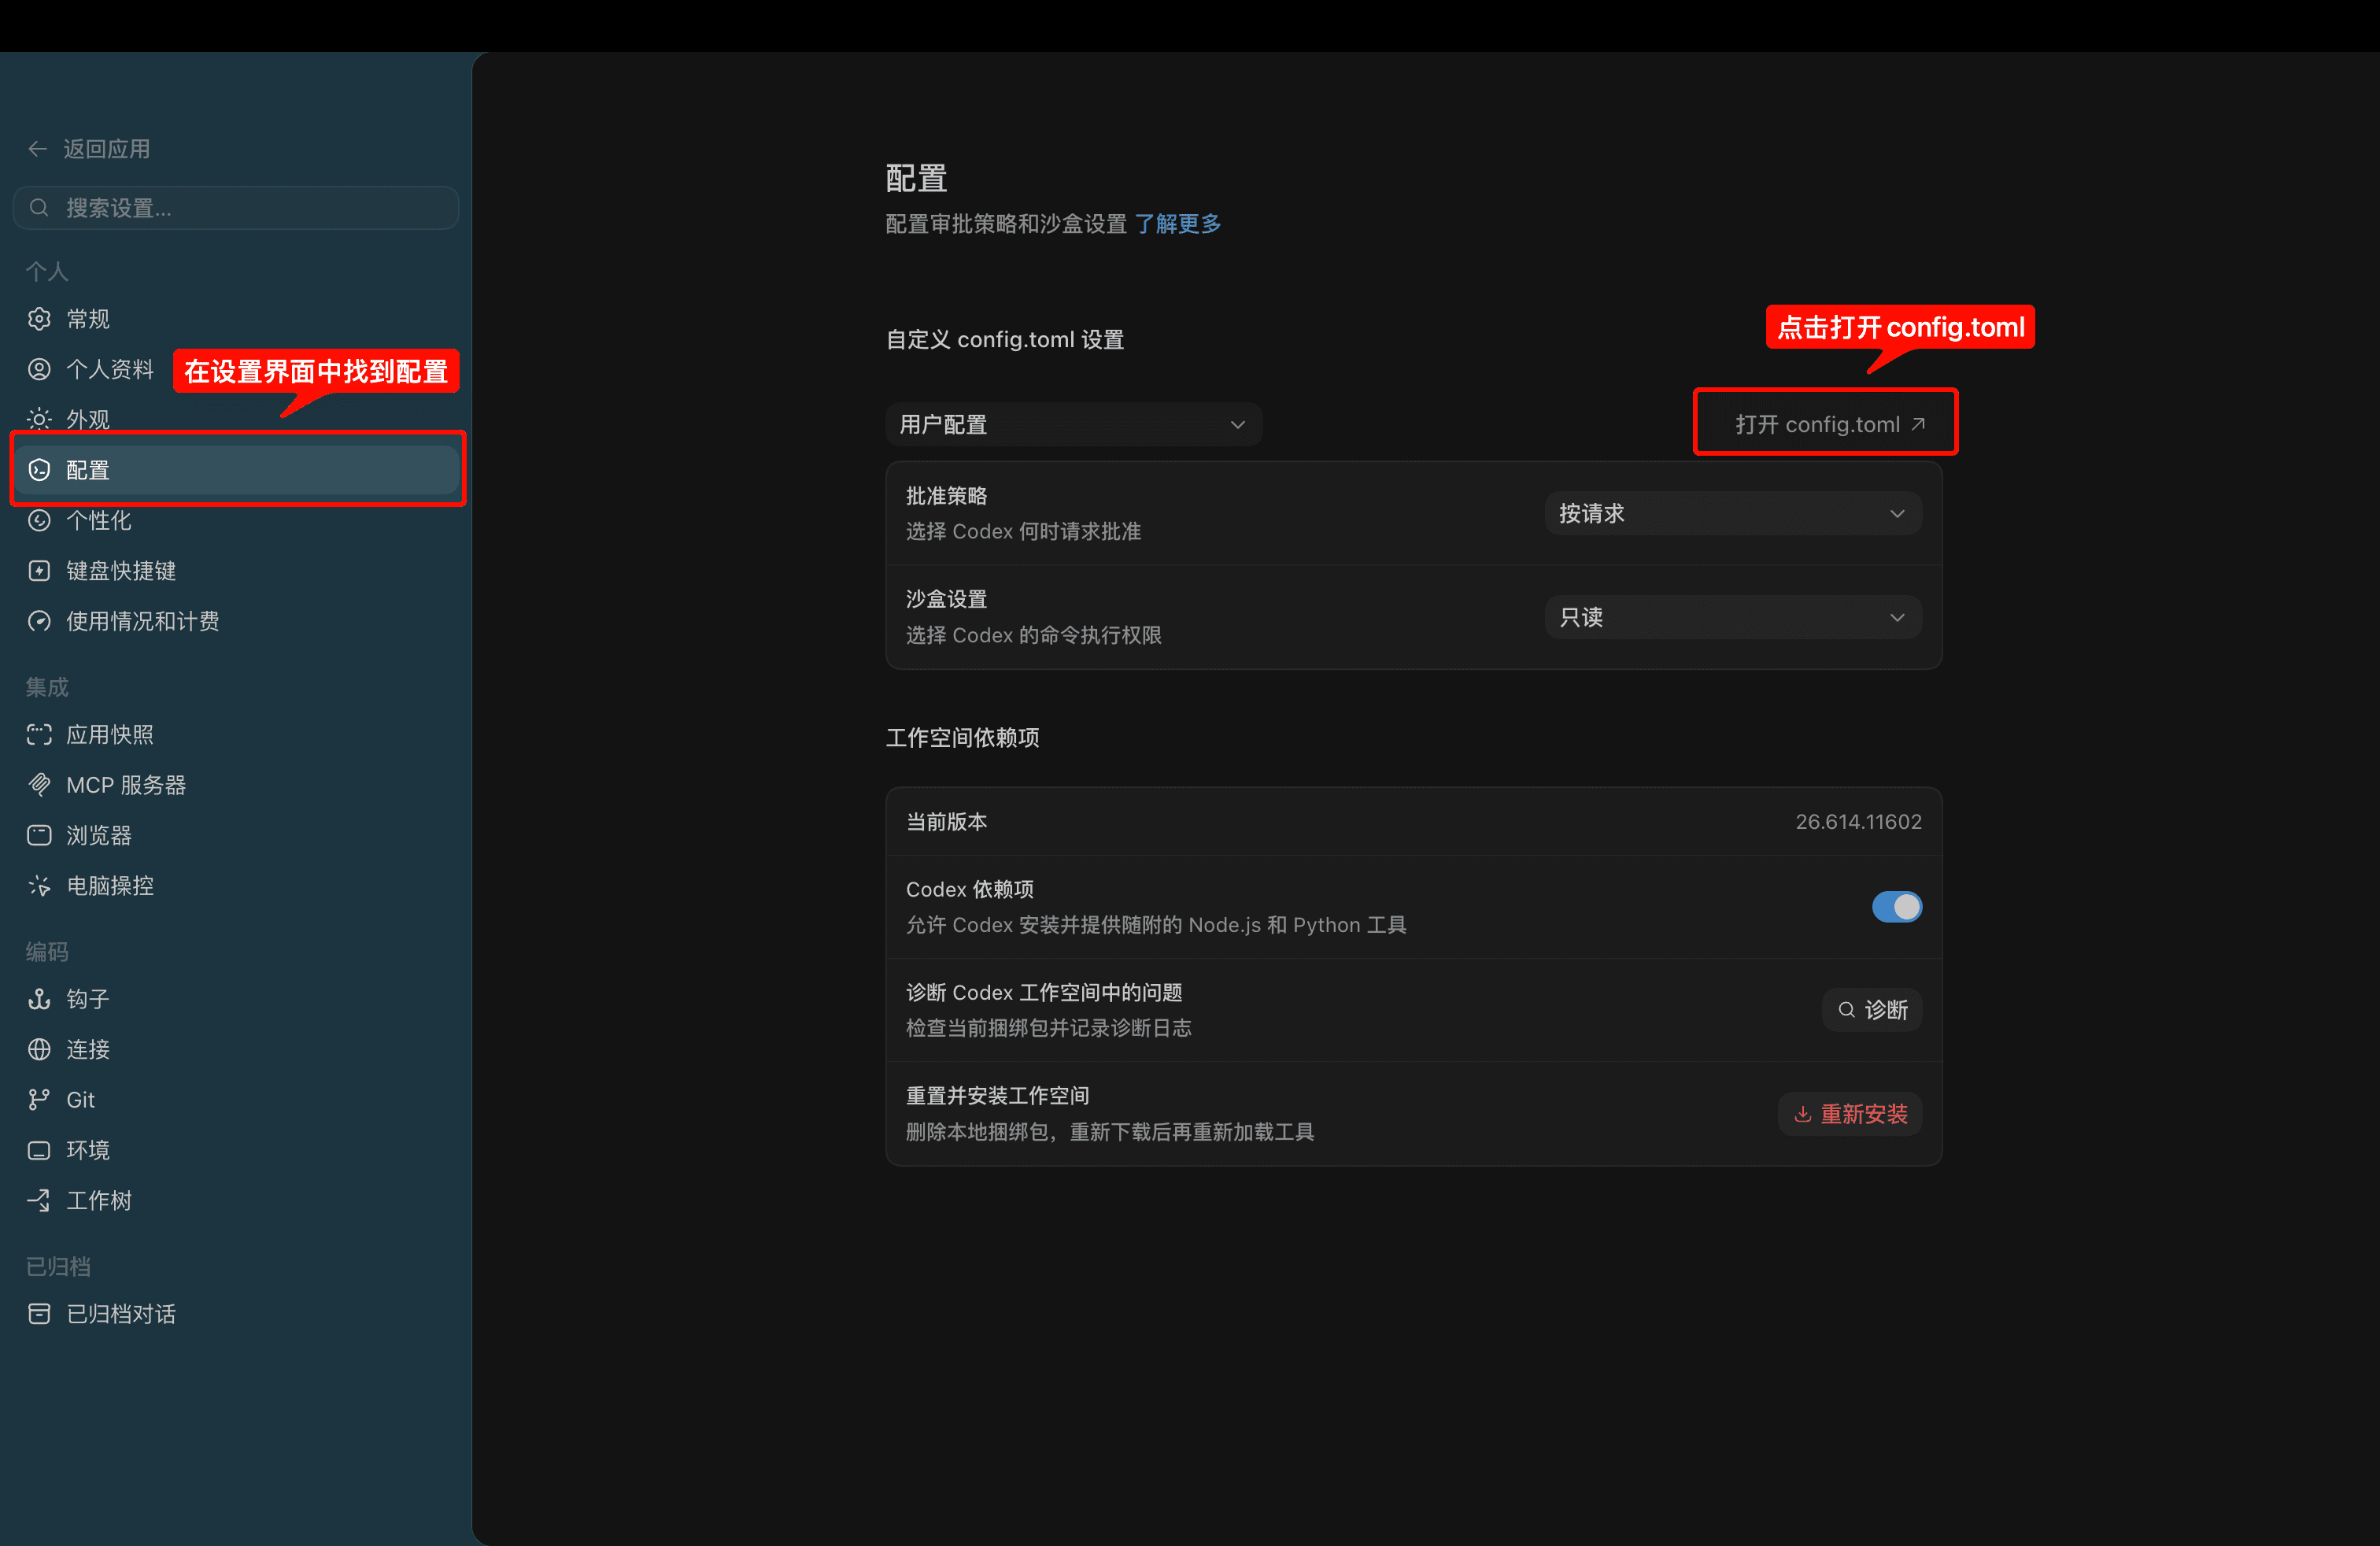
Paste the OnlyRouter provider configuration
Copy the config.toml configuration below, paste it into Codex, and save. It points the Base URL to https://api.onlyrouter.ai/v1 and uses gpt-5.5 as the sample model.
Codex config.toml configuration
# Basic configurationmodel_provider = "custom"model = "gpt-5.5"model_reasoning_effort = "xhigh"disable_response_storage = truepersonality = "pragmatic"
# Custom provider configuration[model_providers.custom]name = "onlyrouter"base_url = "https://api.onlyrouter.ai/v1"wire_api = "responses"requires_openai_auth = true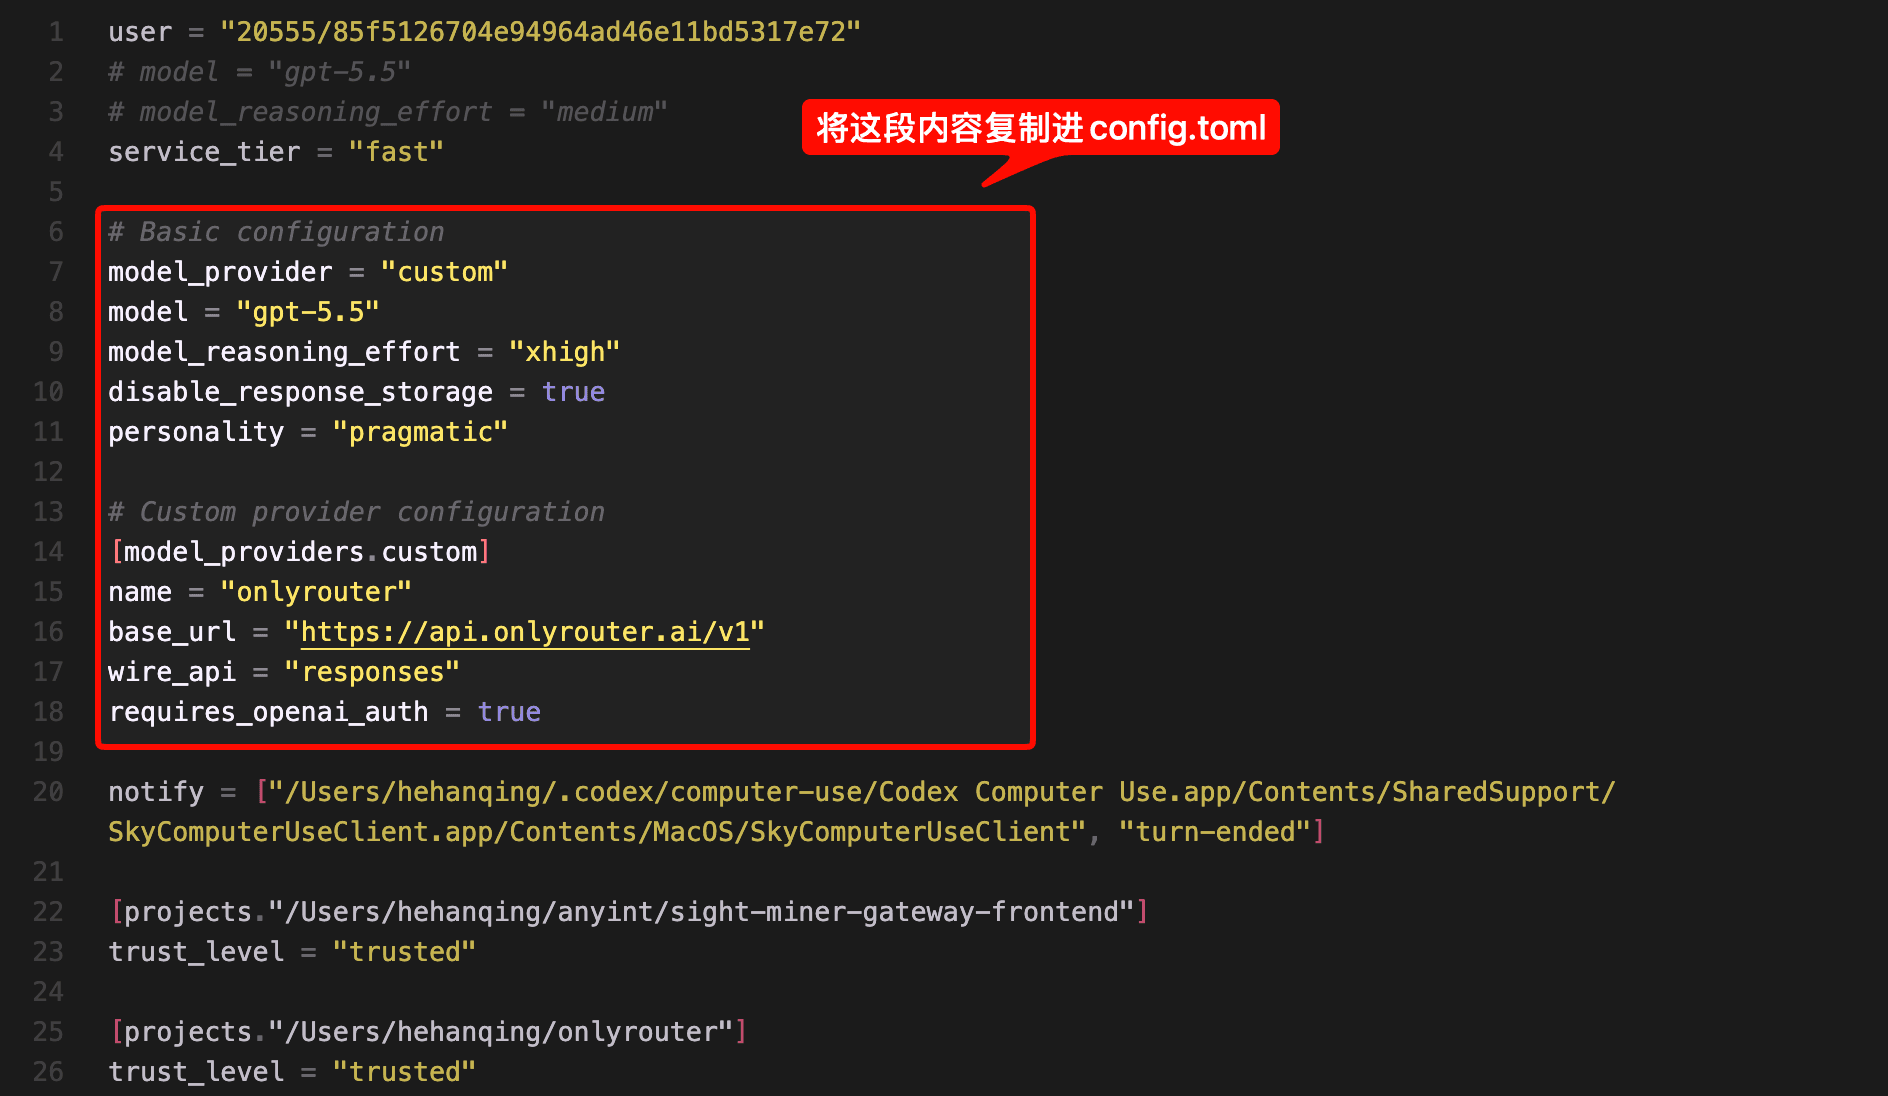
Sign out and quit Codex completely
Sign out of the current Codex account, then quit the application instead of only closing the window. This ensures the provider configuration is loaded on the next launch.
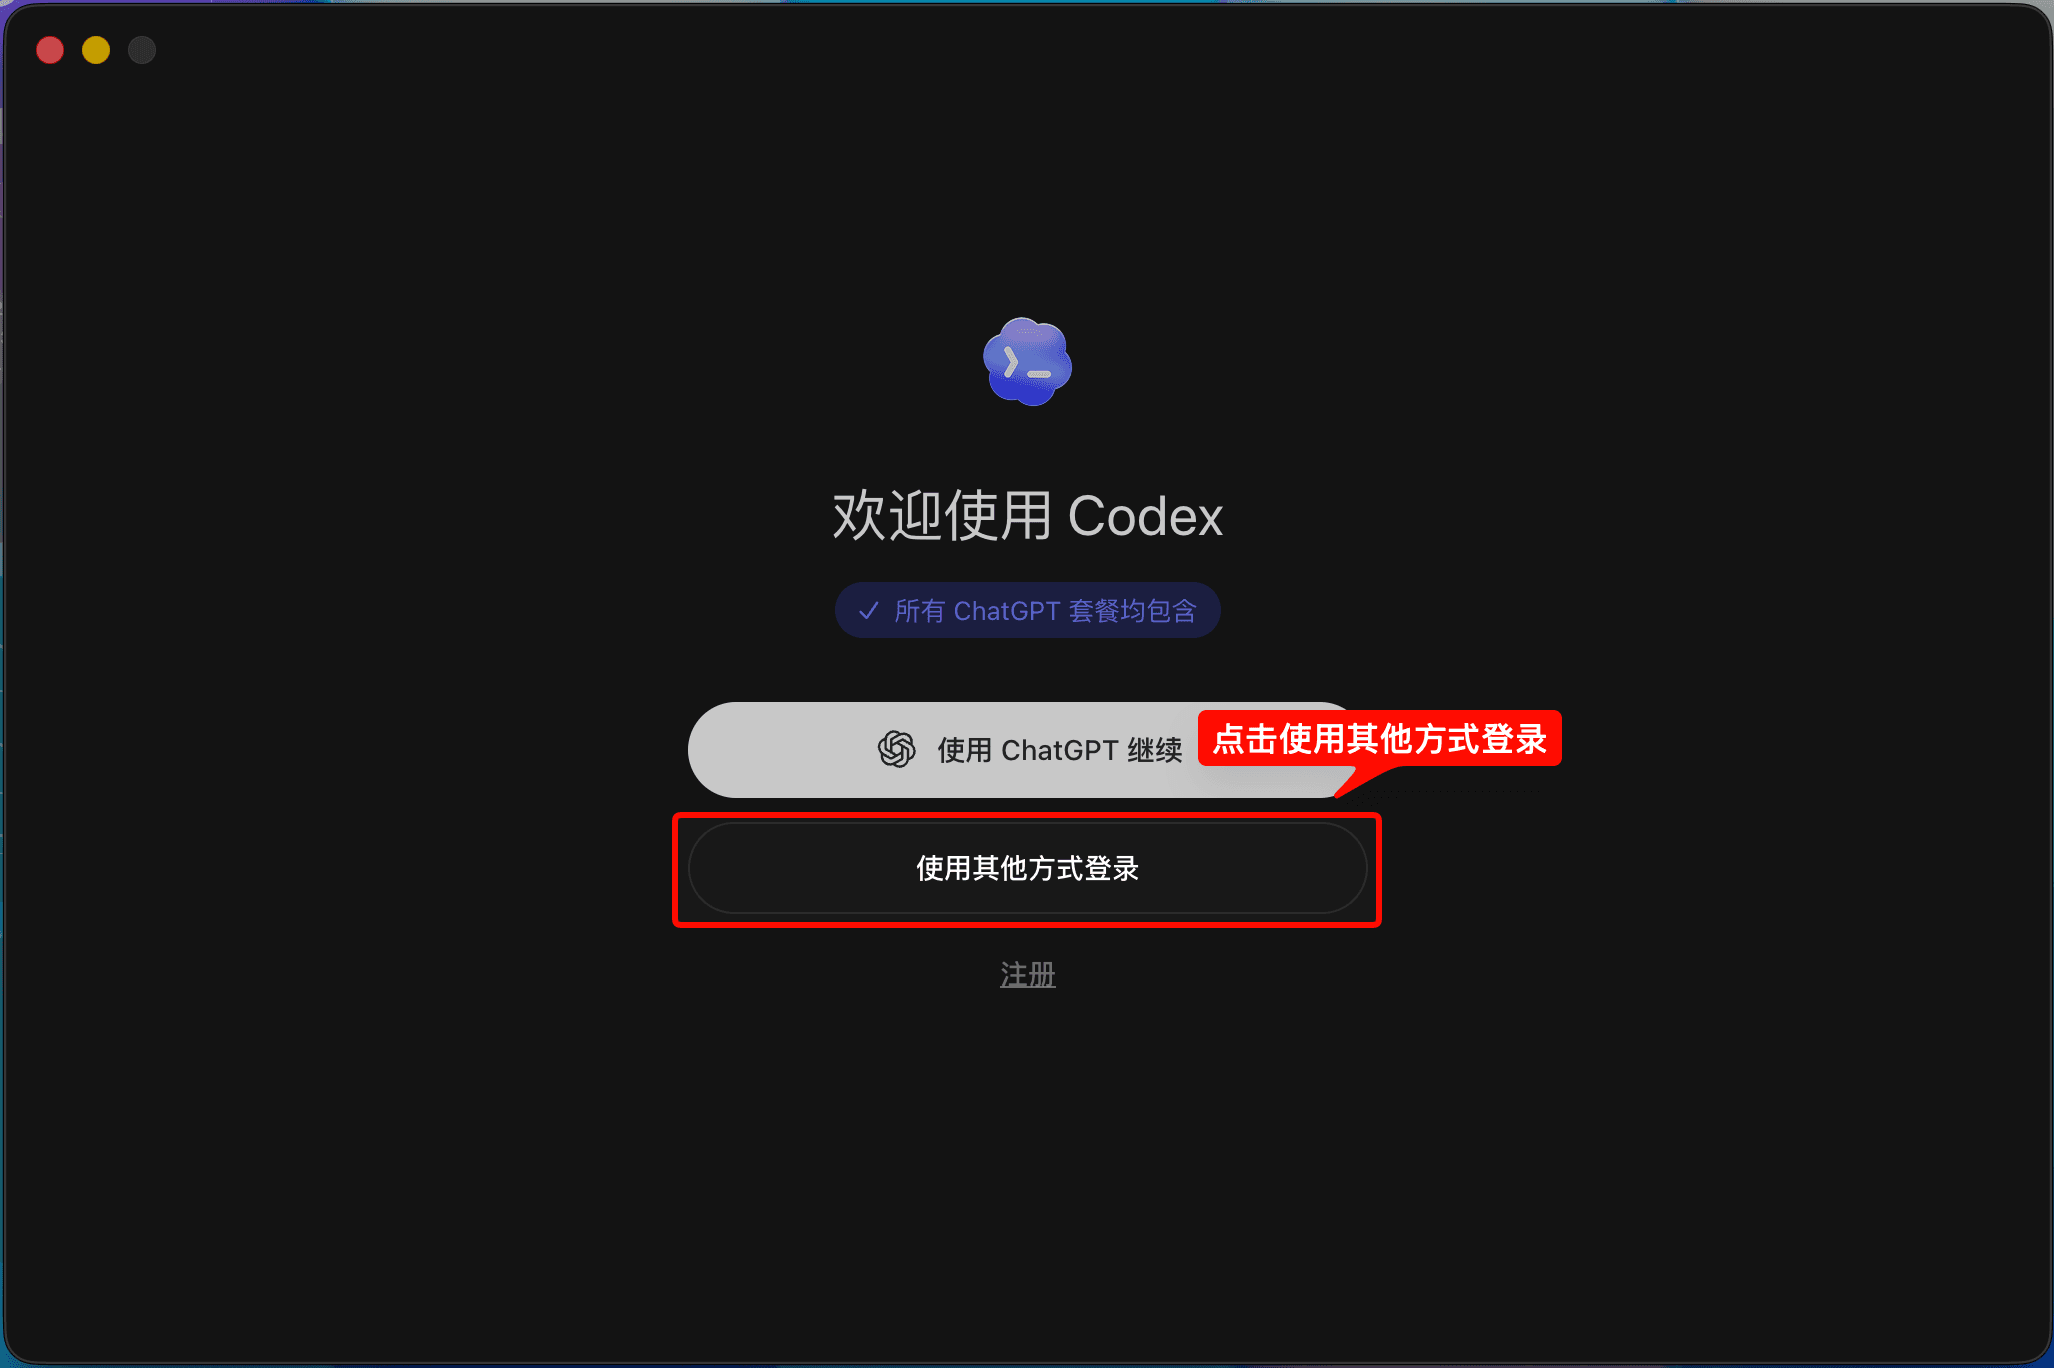
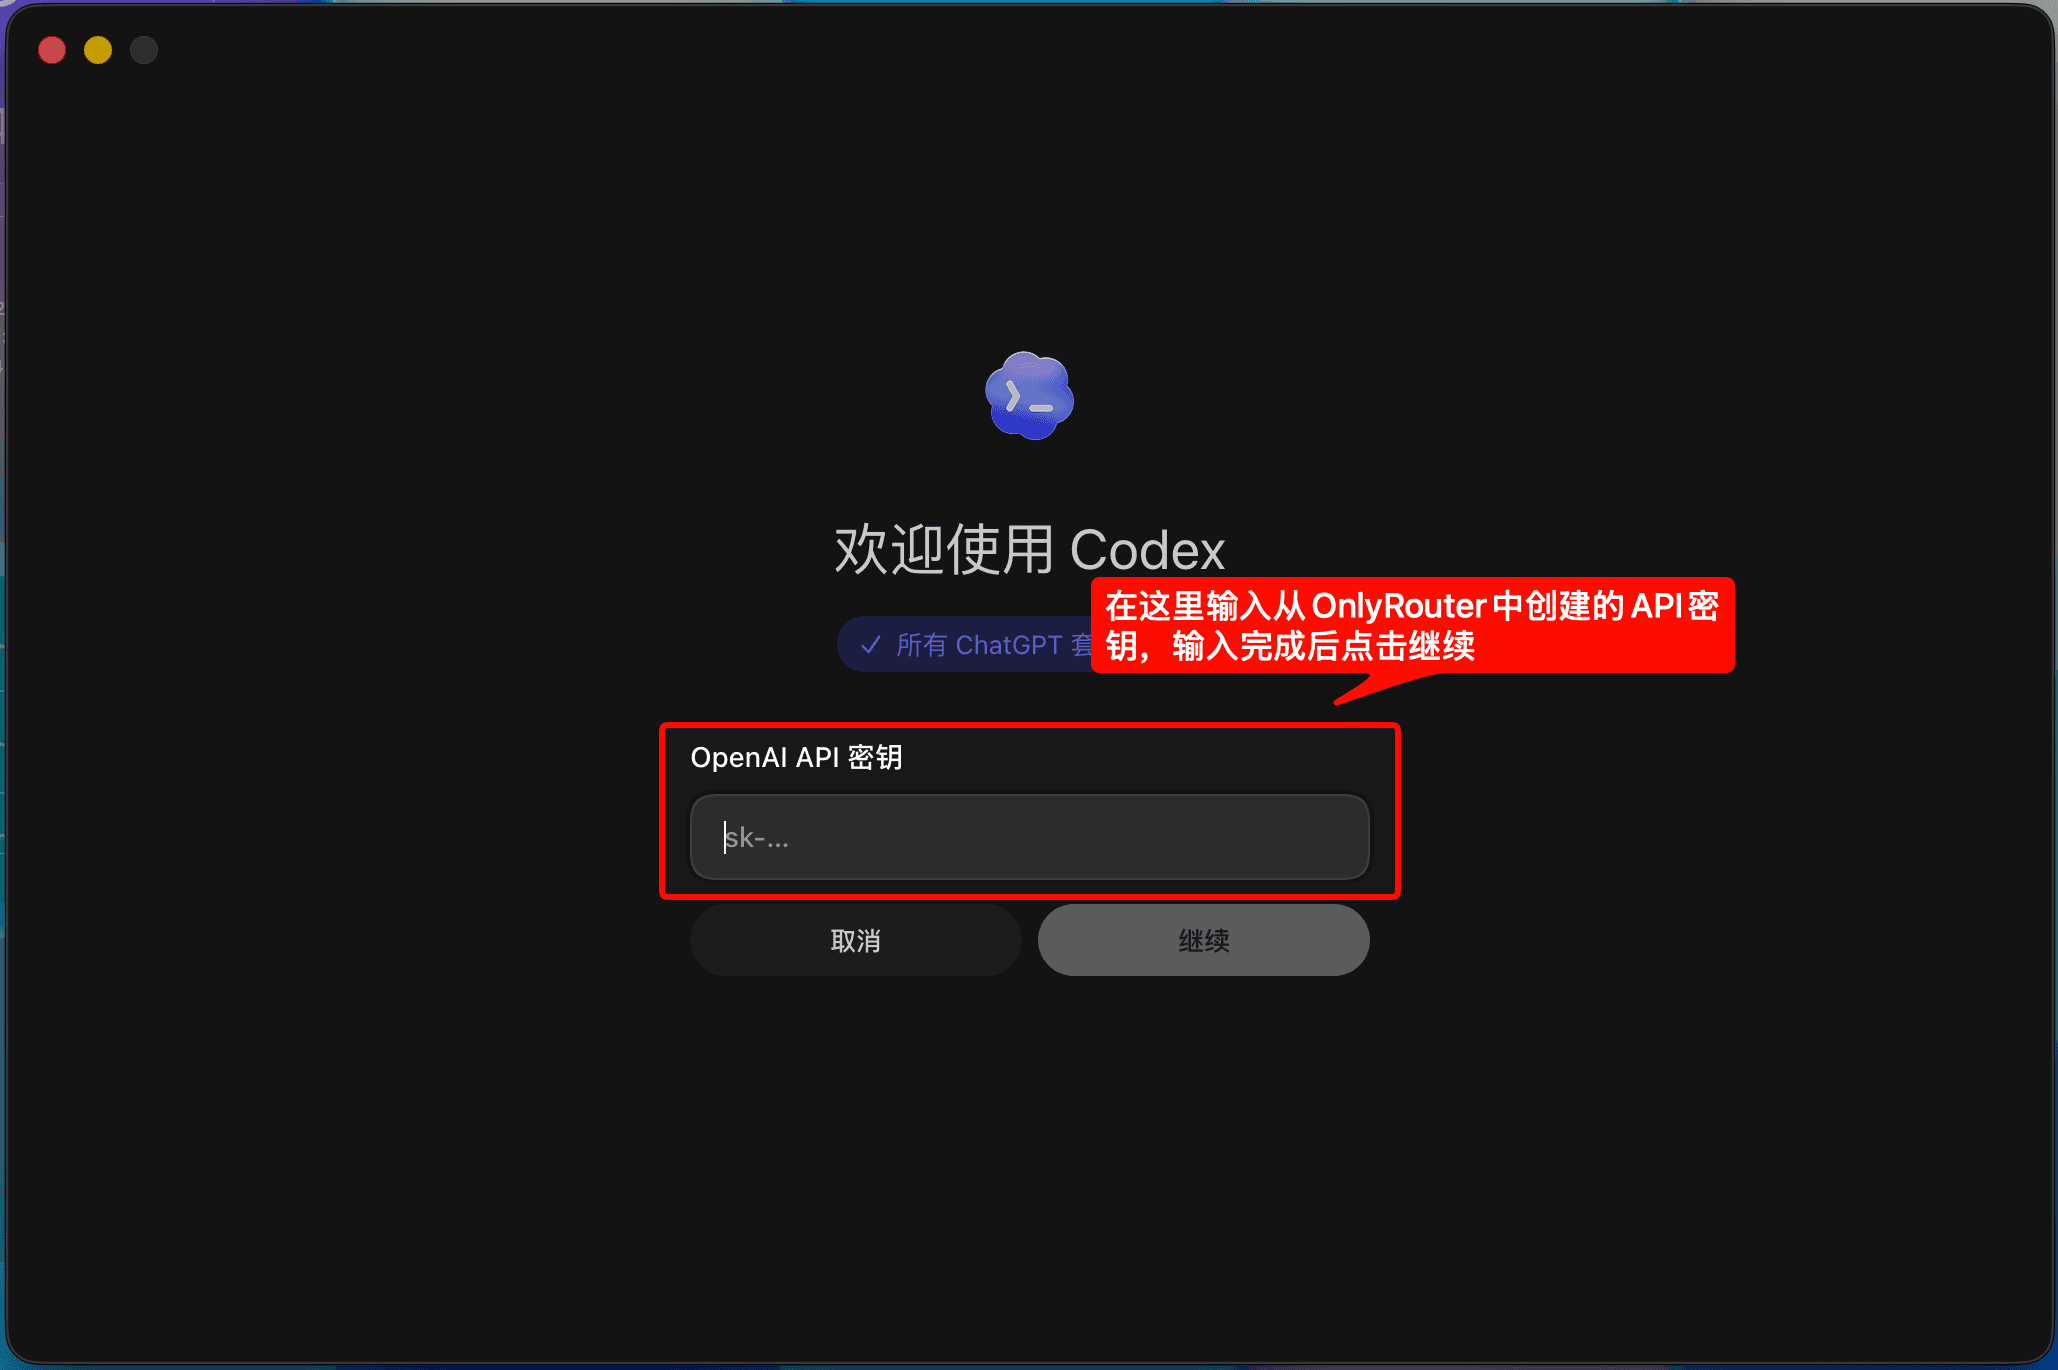
Restart Codex and sign in with an API key
Open Codex again, choose API key sign-in, and enter your OnlyRouter API key. Codex will send requests through the configured OnlyRouter provider.
Copy the poster prompt
Paste the prompt below into Codex so it first generates poster copy, layout, and a final image-generation prompt.
Promotional poster prompt
Create a promotional poster for OnlyRouter. Use https://onlyrouter.ai as the visual reference and focus on the theme "One API key for multiple models."
Target audience: developers using Codex, agents, OpenClaw, Claude Code, or custom tools.Visual style: dark and technical, clean, professional, and fast without excessive decoration.Poster size: prioritize a vertical 1080x1350 social-media layout and also suggest a 16:9 adaptation.
Copy structure:1. Headline: One API key for multiple models2. Subheadline: Access GPT, Claude, Qwen, DeepSeek, Kimi, and more through OnlyRouter3. Three benefits: one Base URL, unified usage records, and compatibility with Codex and agent tools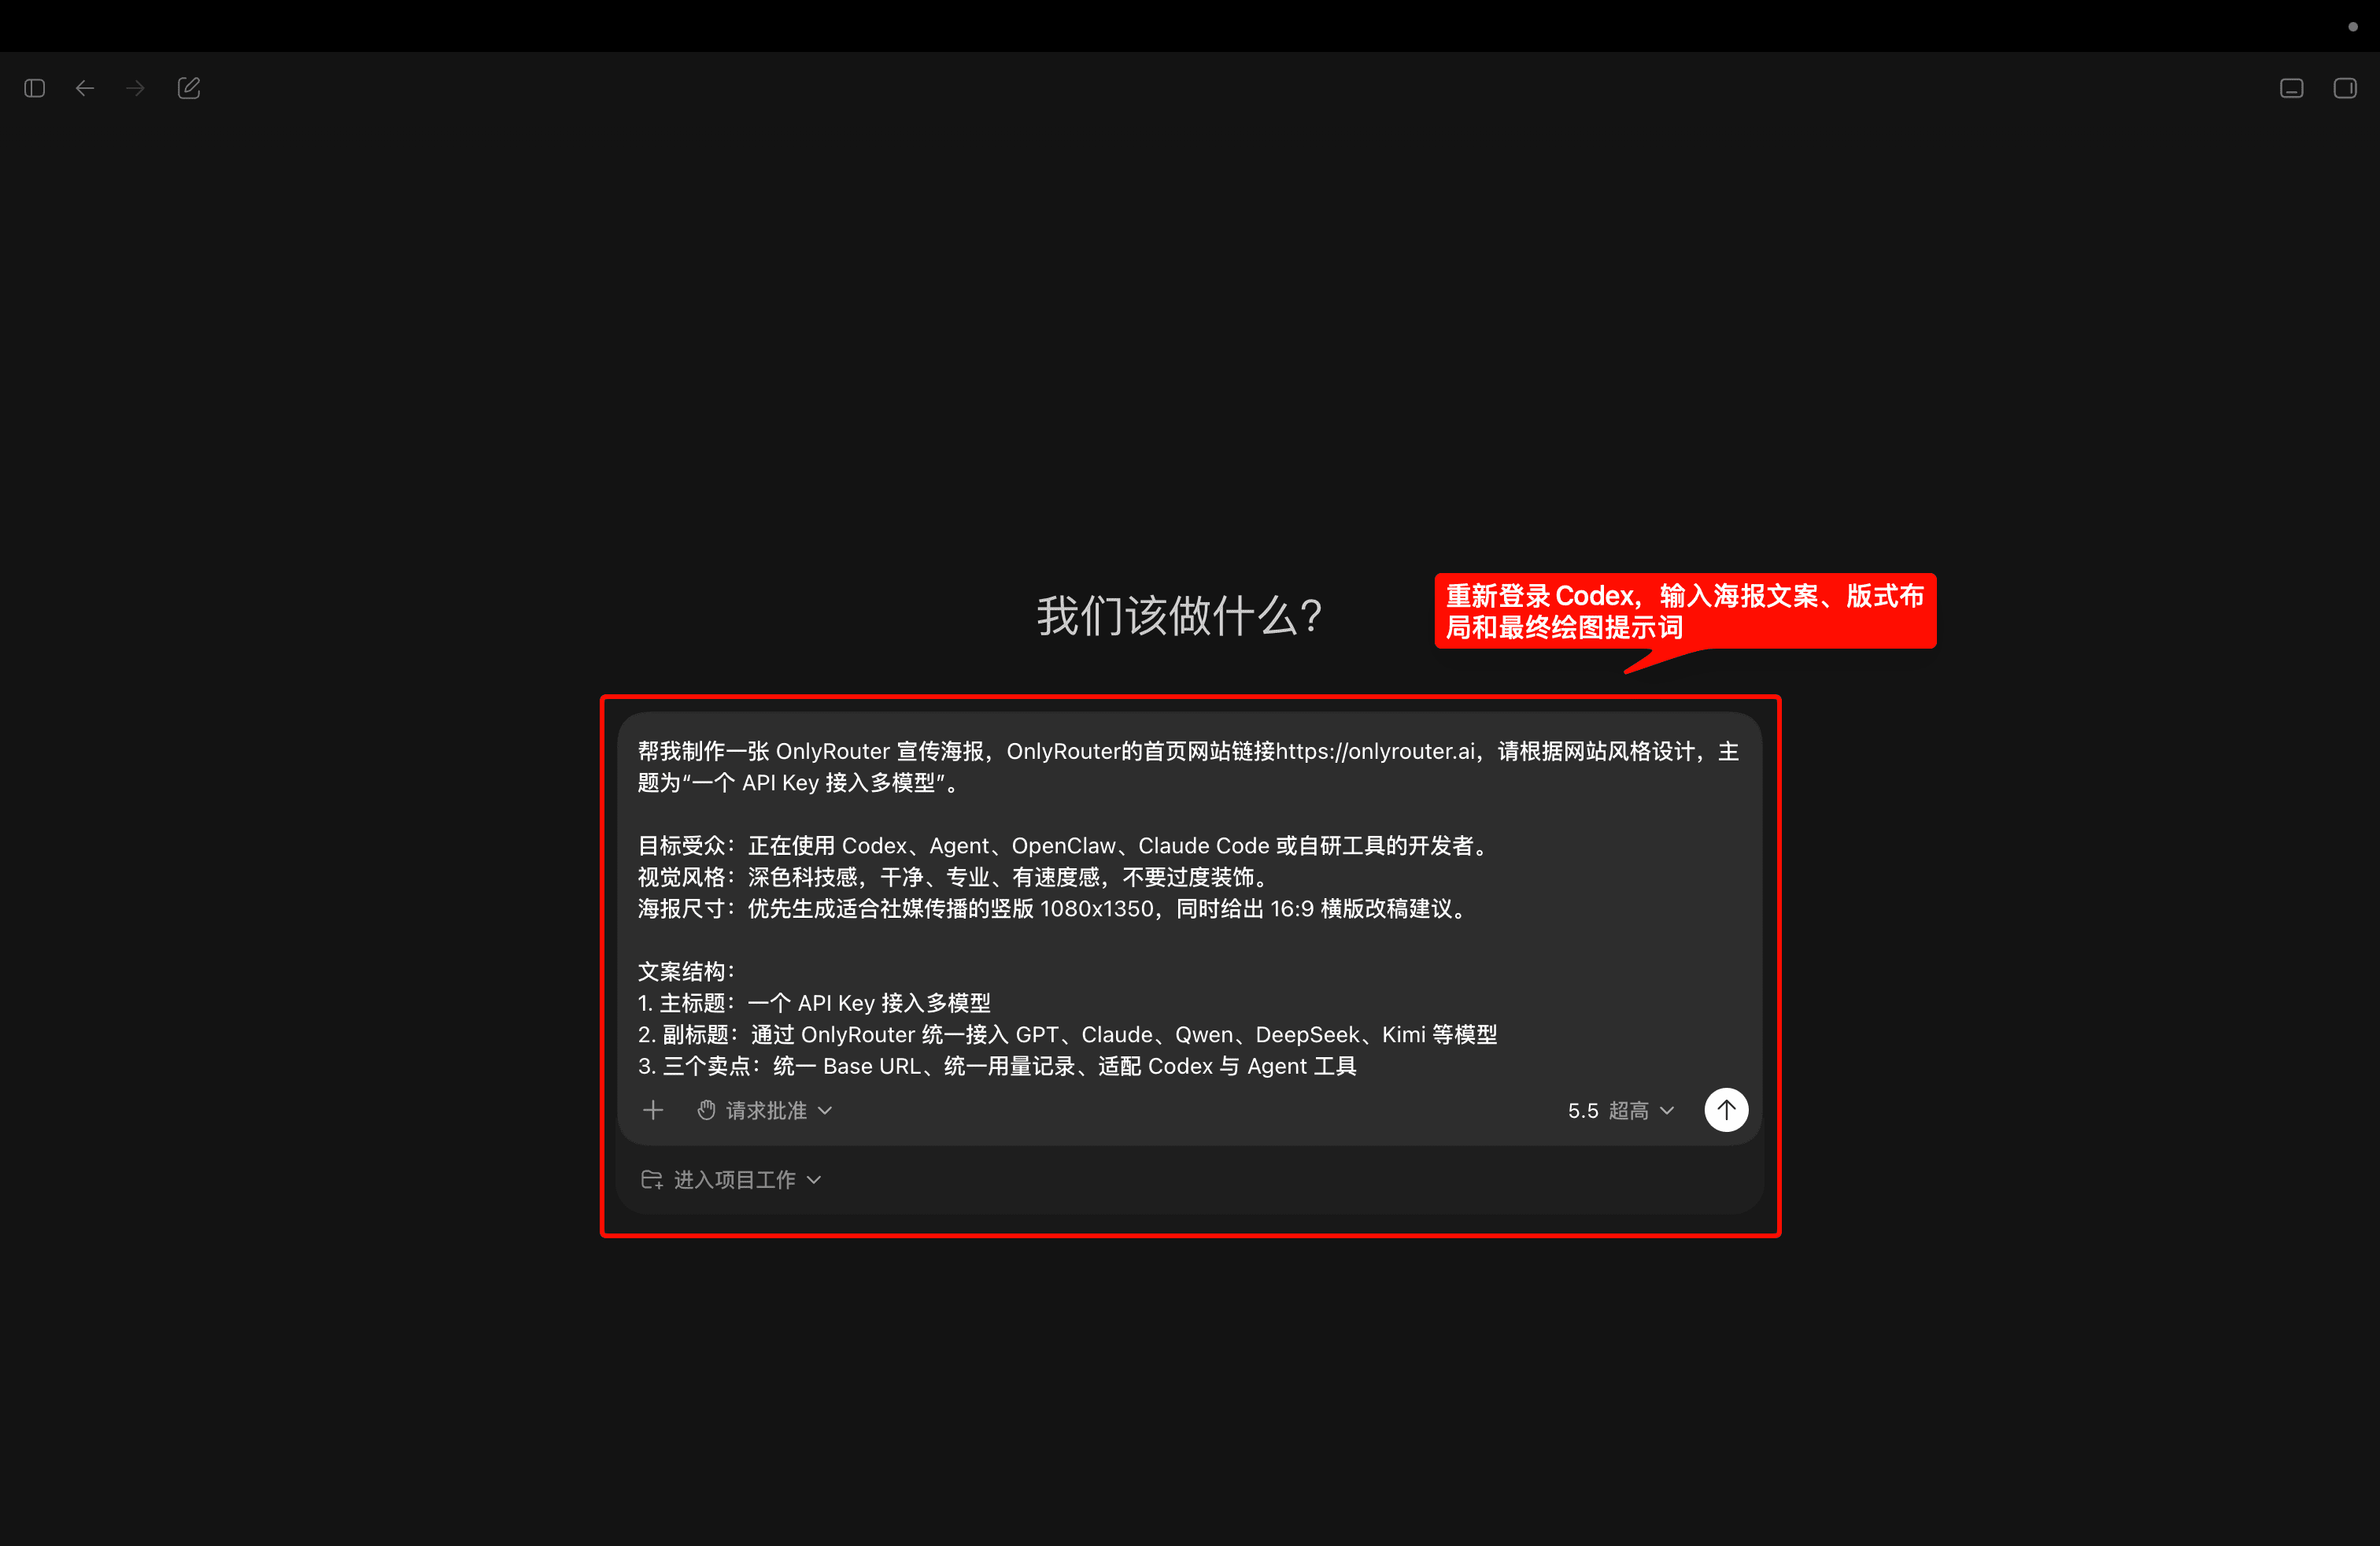
Iterate on copy and visual direction
Refine the output with requests such as "make it better suited to a developer community," "create an English version," or "adapt it to 16:9." Keep one final copy version and one image-generation prompt.
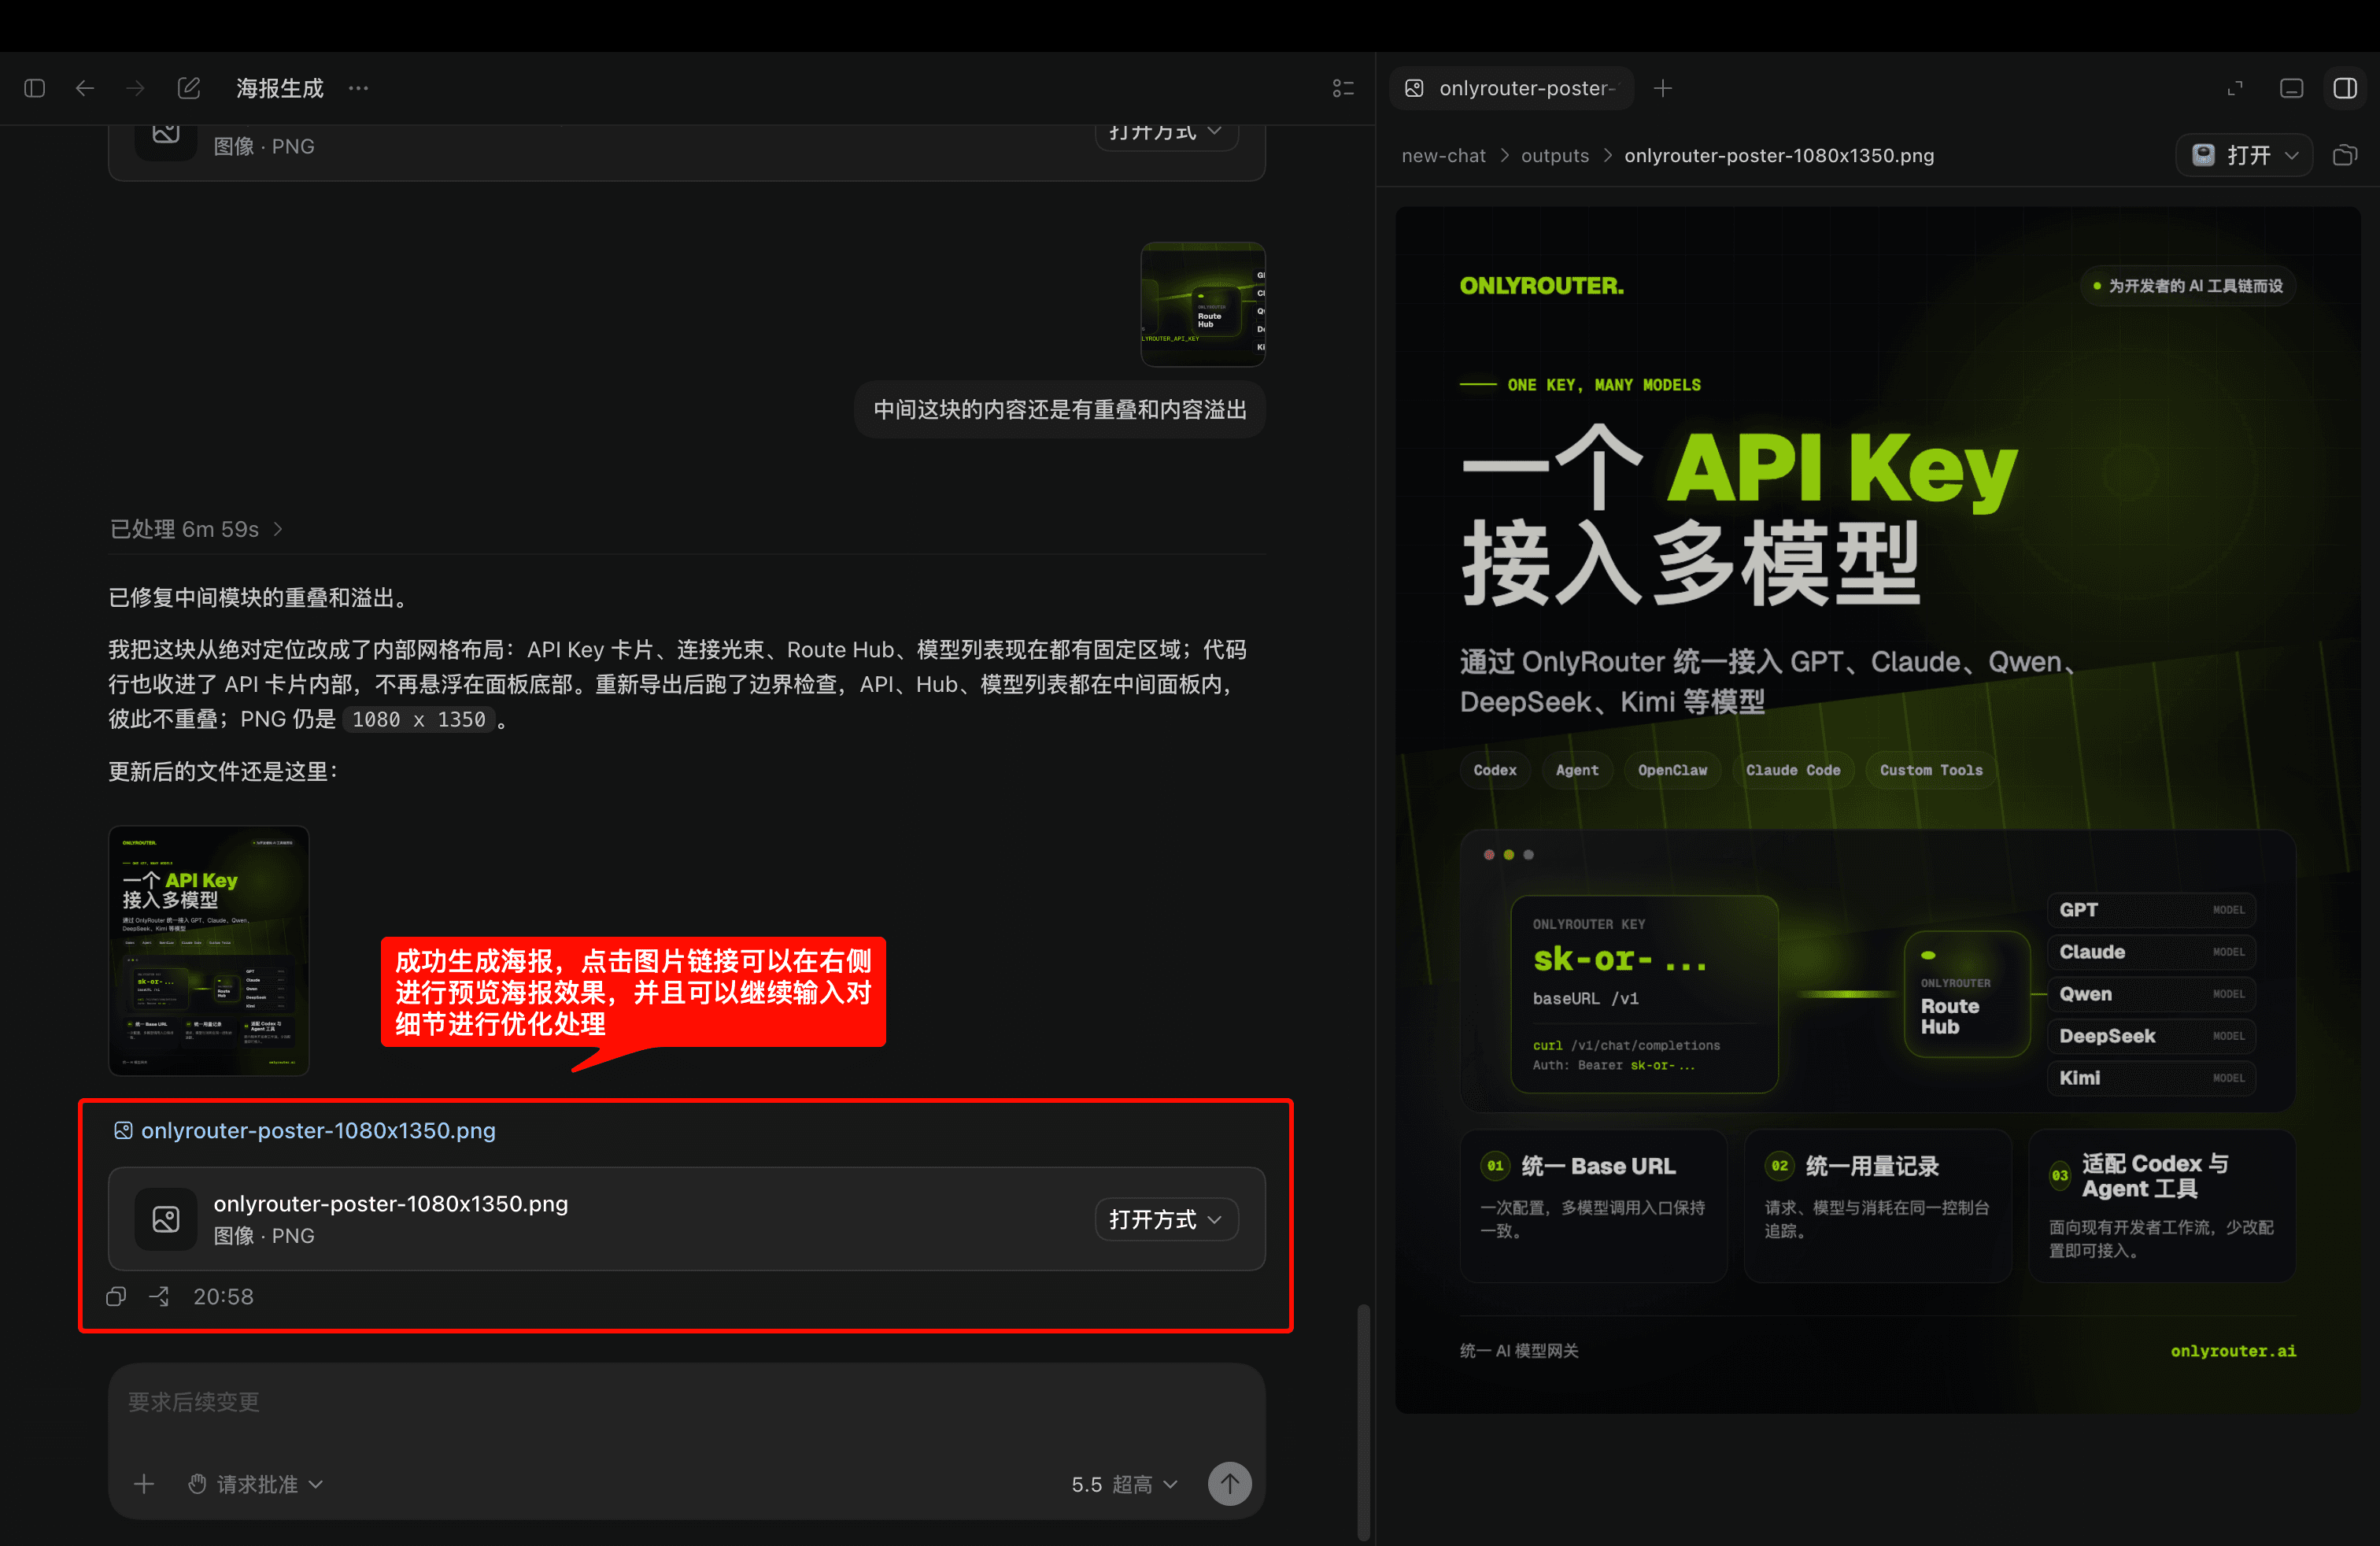
Verify the call in the console
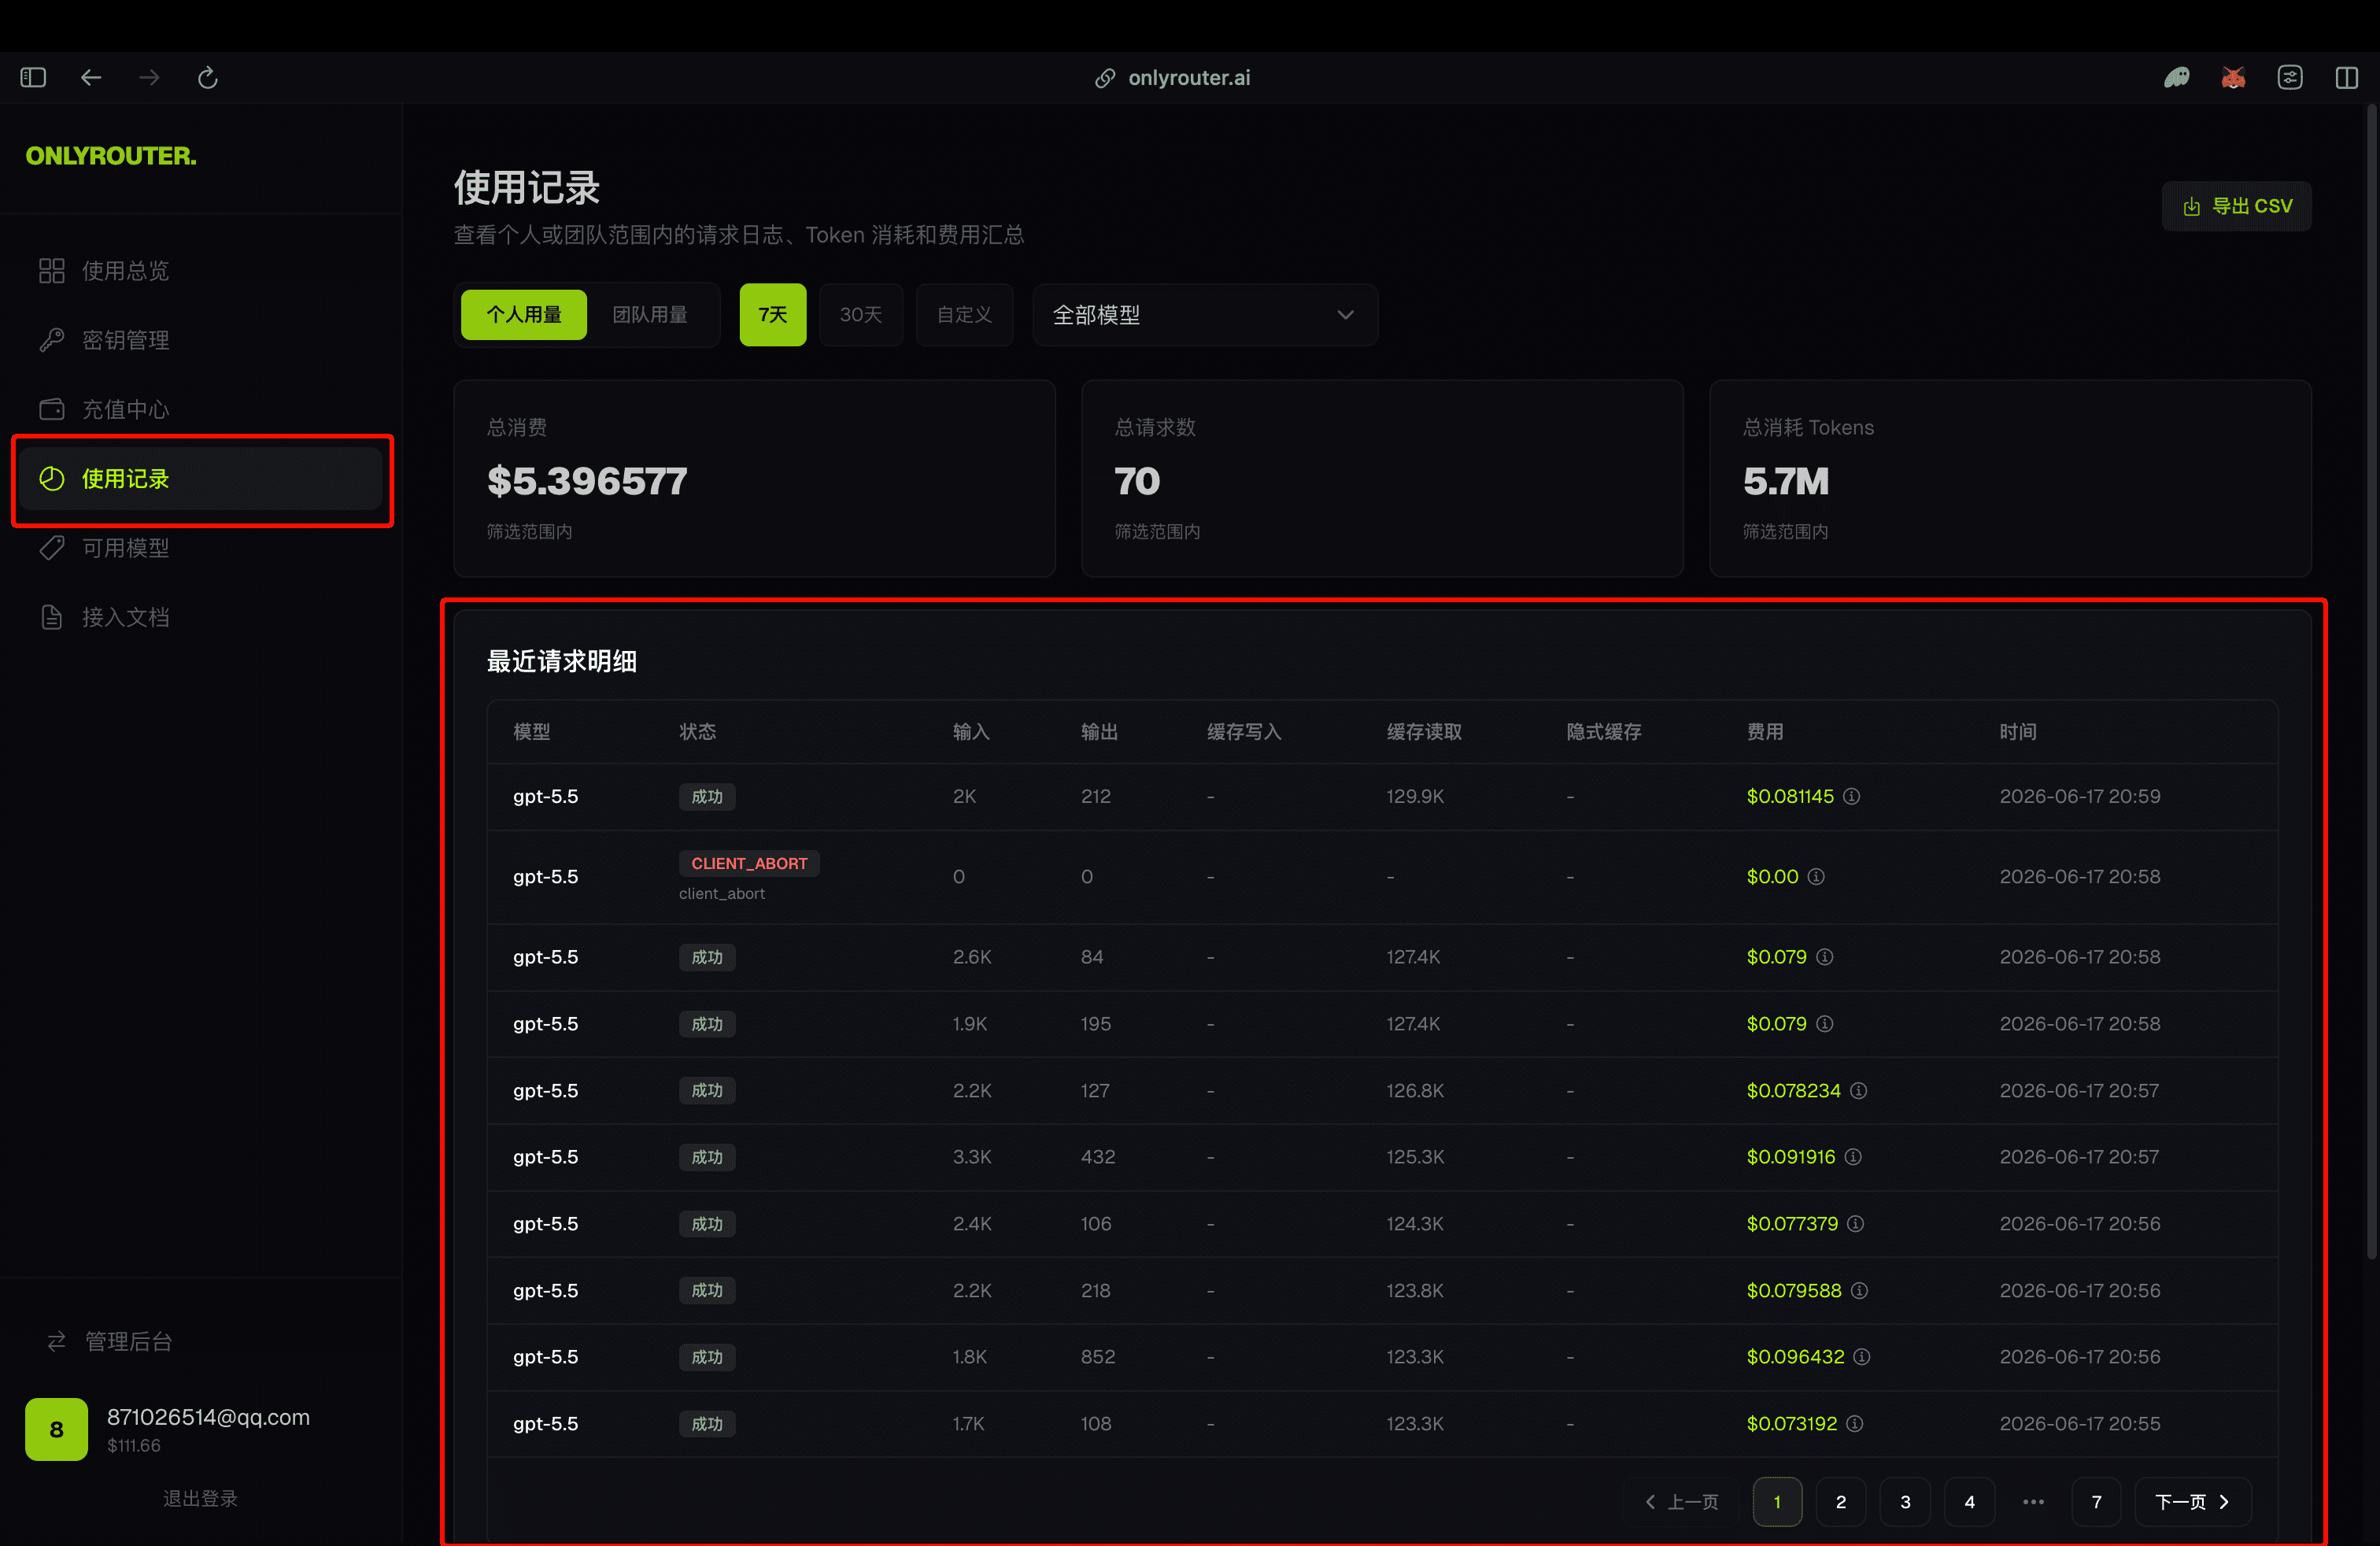
Open OnlyRouter usage records and confirm the model, request time, and usage for the Codex call.
Tutorial complete
Frequently asked questions
Q: Which models are supported?
A: Claude Opus/Sonnet, GPT, DeepSeek, Gemini, and other leading models are coming soon. See Available Models for the complete list.
Q: Which API protocols are supported?
A: OpenAI-compatible chat completions and Anthropic-compatible Messages are supported. Choose the matching example for your client.
Q: How do I get an API key?
A: Create an account, open API Key Management in the console, and select Create New Key.